
Yoast SEO is the most powerful plugin for doing SEO for WordPress websites. It has more than 5 million webmasters use. Yoast makes our SEO work easy and faster to get a higher rank on Google – the wish of all bloggers and online entrepreneurs.
So in this article, Mr. Thom guides you on how to install (easy steps) and configure Yoast SEO plugin correctly. It is because I have many questions to correct installs of Yoast, which makes many websites go and index wrong on Google.
I tell you a story that when I was a beginner, one of my sites got too many indexes on google when I checked it. This was called bloating index, that was bad for ranking. It is because I discovered some pages just had only photos, which made me confuse and worry. The mistakes which I did were on the Media of Yoast SEO plugin. I allowed my photos created their own URLs to index on Google.
I think you do not want silly mistakes which I got. Is that right? Now check how to install and set up Yoast SEO to make your websites perfect for readers’ experience.
Note for who did install the Yoast SEO plugin from 14+
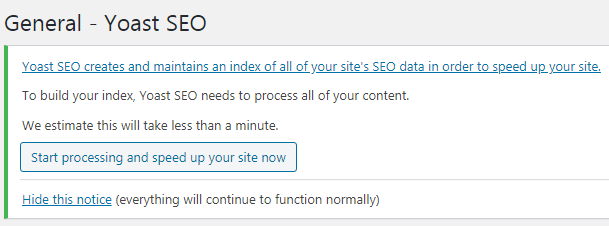
The Yoast SEO plugin gives an announcement about the index of metadata, including titles and meta descriptions. These databases will combine and save at one table to improve the speed loading pages.
To start setting up this feature, you click on the “Start procession and speed up your site now”. If you do not do this action, the new posts will gradually save at a new table.
If you want to know more informatin, please see details of creates and maintains from Yoast.
Some features of Yoast Seo plugin to study before install it
Yoast SEO is the most popular SEO WordPress plugin with many excellent tools and features; it includes a free plugin and premium plugin.
Free Yoast SEO is enough for beginners for most of the websites. Also, here it works:
- Support to change the title of the posts, pages, and meta descriptions on each post and pages for showing on Google.
- Can rewrite meta titles and description for categories, and tags.
- Show meta snippet on Google search results.
- Check focused keywords.
- Control meta robots configuration.
- Have on noindex, nofollow on any pages, or posts.
- Set up the XML Sitemap.
- Interact with Google Webmaster Tools, Bing, Baidu, and Yandex.
- And more…
Yoast SEO basically has the main functions of search engine optimization for WordPress websites. Configuring Yoast SEO may be a bit difficult for WP beginners. If the configuration goes wrong, the advantage of Yoast SEO is reduced; in some cases, search engines will mark bad and warning for your websites.
Install Yoast SEO plugin in WordPress
The crucial work is to insert Yoast SEO. If you have it with your site, you should update to the latest version to make it safe and better work with new features of search engines.
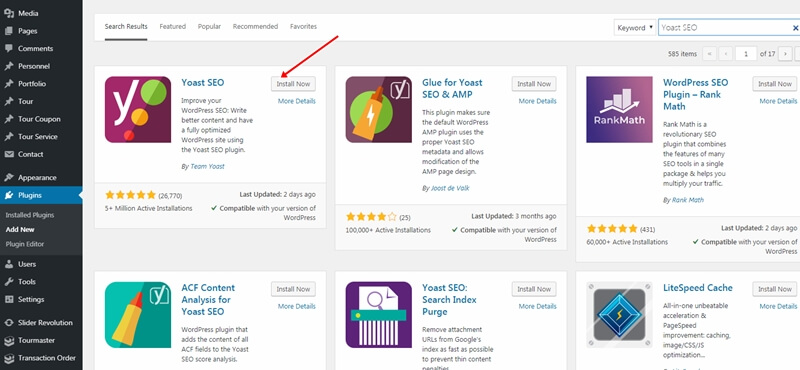
- And, remember that you need to type a correct name of this plugin “Yoast SEO”, it is written by Team Yoast.
- Download and install the plugin. You can install it via the control panel of your website or download its pack to your computer and then upload to the WordPress hosting via FTP software.
I like to install this plugin as well as the others through the dashboard of the website; it is an easy and fast way.
To install it, login in the admin of your website, click on Plugins -> Add New -> Search for Yoast SEO -> click install now -> Activate. Finish installation.
Now we start to set up Yoast SEO with step by step.
Step 1: Starting with General (General Setting)
When you click on the “General” item, you see a right-hand side there are 3 items: Dashboard, Features and Webmaster Tools.
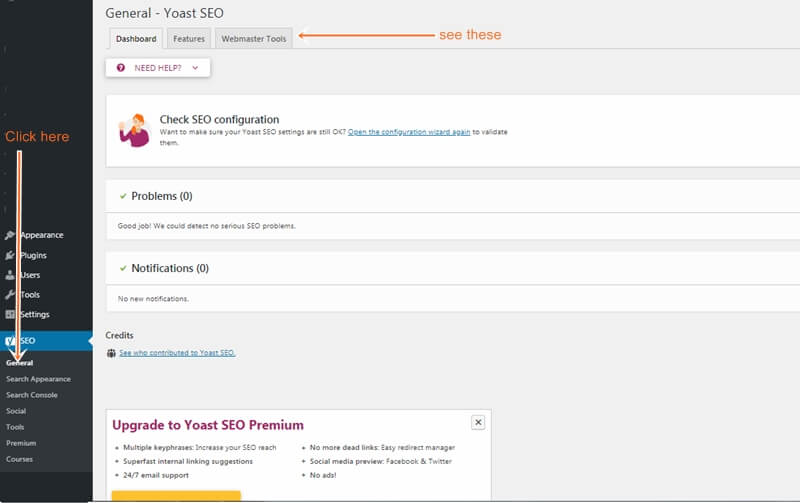
- Dashboard tab: displays SEO announcements, including tips or errors on your website. This tab does not have any notice to do with the new websites so that you can ignore.
2. Features tab: allows you to turn on / off the main features of the Yoast SEO plugin.
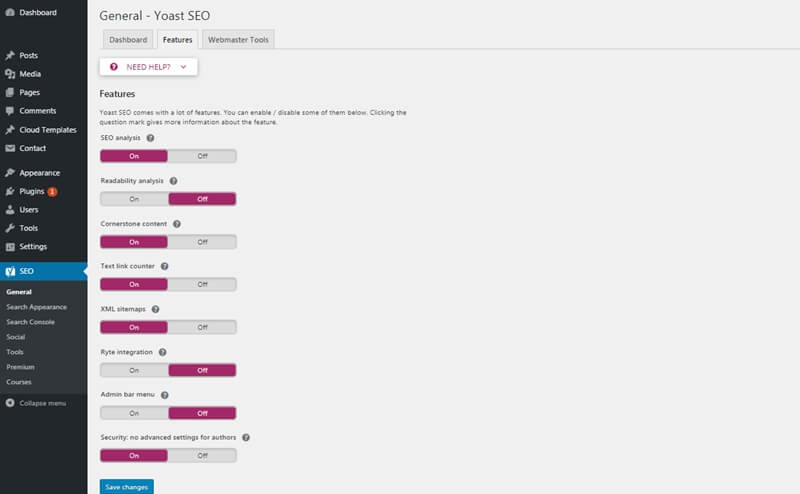
- SEO analysis: Turn on, so Yoast SEO provides suggestions to improve SEO for your contents when writing articles.
- Readability analysis: Turn off, this is an easy-to-read scoring feature of a post, and if you are confident about your writing style, you can turn it off by selecting off.
- Cornerstone content: Turn on should be enabled; this function allows you to mark what kind of content is the core on your website.
- Text link counter: Turn on should be enabled to help you count the number of text links in each post and page.
- XML Sitemaps: Turn on to create XML sitemaps for the website. This is one crucial feature which helps Google to read your site easily.
- Ryte integration: Turn off; no need to see the index of the website on search engines every day.
- Admin bar menu: Turn off, this displays Yoast SEO toolbar on the Admin bar. You can turn it on and off. However, I like to turn off it.
- Security: no advanced settings for authors: Turn on, this item is On to help improve the authors’ settings to prevent them delete posts.
After finishing, press “Save changes.”
3. Webmaster Tools: This tab allows you to insert your blog/website verification code with search engines like Baidu, Bing, Google, and Yandex. Usually, we need to verify with Google. That’s enough.
However, I often ignore this. I mean that I do not insert any codes here. It’s because when connecting them here, this makes the website heavier. Also, I do not want to log in the website to check what my data happens on Google, because Google webmaster and analytics are great places to study, and it’s worth login to work with the data on there.
In spite of that, you can check the way to insert this when you like to set up it.
You need to click on the word “Google Search Console”.
You are taken to the Webmaster Central page, select the Alternate methods tab HTML tag and copy the code inside the quote of the content.
Example: <meta name=”google-site-verification” content=” nWfyVukdeJuR1fZBe2GDyourcode”>
Go back to the Dashboard page of SEO website, paste it into the Google Search Console box, and click Save Changes.
Finally, return to Webmaster Central of Google to press the “Verify” button to verify it, it is done.
Step 2: Setting the Search Appearance
Search Appearance is the essential part affecting your SEO work, so you need to configure it correctly.
1. General tab: You can refer to the settings below:
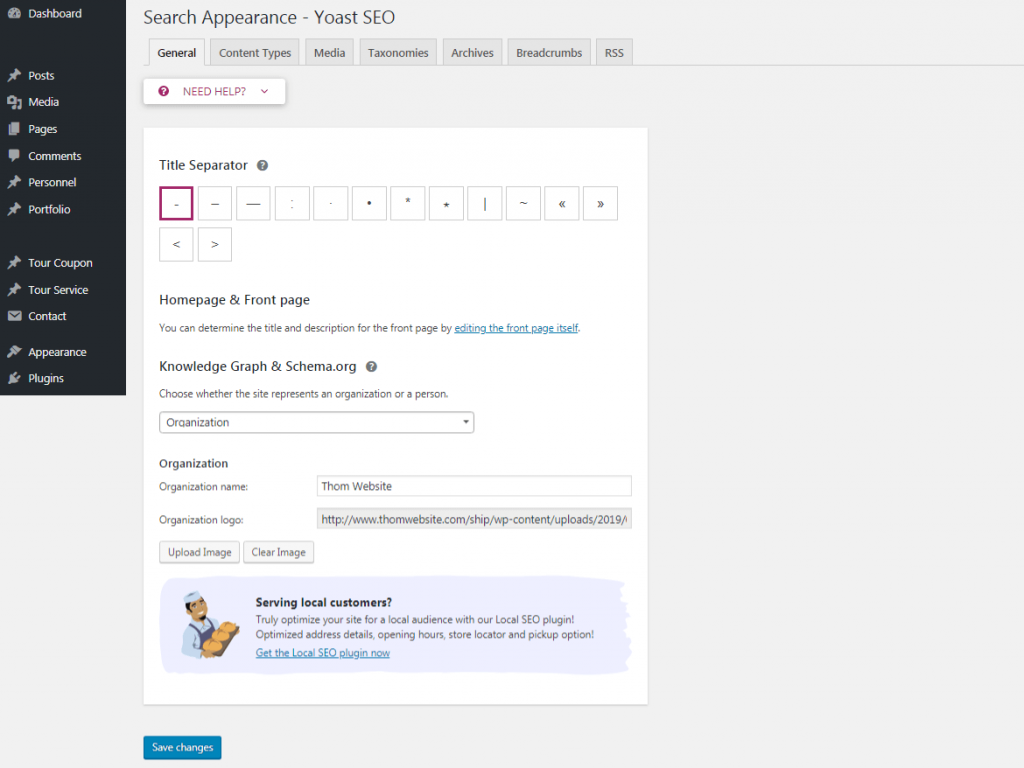
Title Separator: Select a character type that separates the page name and description line of the page. This is just for looking, not important for SEO skills.
Knowledge Gram & Schema.org: you choose Organization if you are an organization, choose “Person” if your blog is personnel. I recommend to choose “Organization”, write your Organization name, and upload logo.
2. Content Types:
Depending on the theme and the plugins you are using and inserting, this section has different items. If your blog is new, there are 2 items: Post & Page. (My site has many items.)
However, most of them are similar, so you can set up as below in the photo.

Notes:
- Show post in search results: Turn on, Yes to display posts/pages on search results.
- Date in Snippet Preview: Hide to turn off, because I do not want my posts/pages display the date of posting content. You turn on if you want to show the dates.
- Yoast SEO Meta Box: Show to display Yoast SEO Meta Box in the content editor.
- SEO Tile: Just let them as original as above image.
Meta description: You can leave this section blank (recommended).
Then, click “Save changes” to save activities.
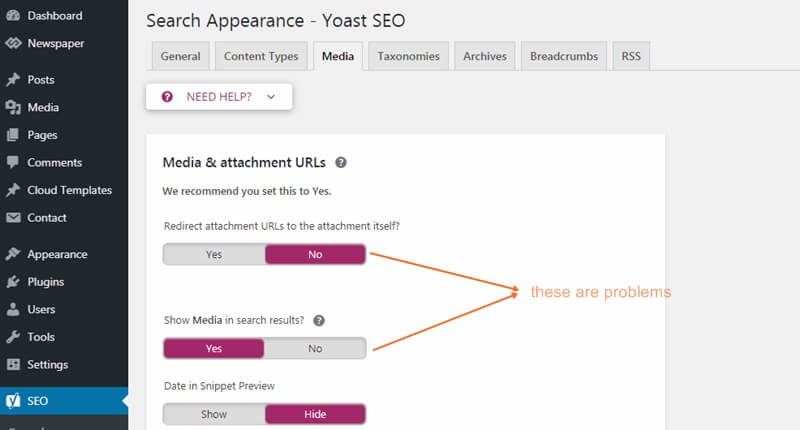
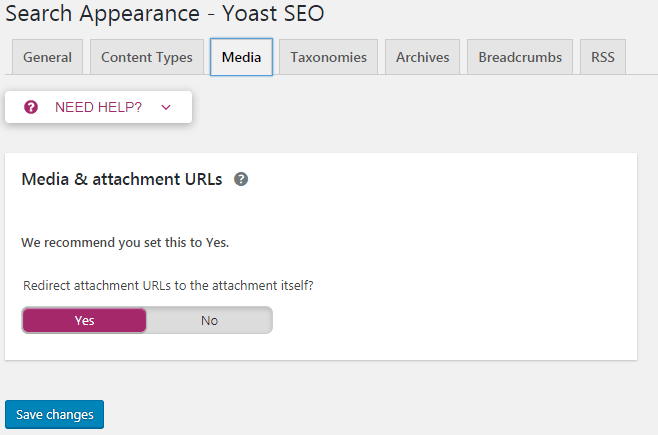
3. Tab Media: You choose Yes to Yoast plugin SEO automatically redirect the URL of the photo attachment to its URL. I used to get a mistake when I did not note this, and it set at no. The result was that my site got hundreds of non-sense pages because of the only photo. This is really bad for Google ranking.
4. Taxonmies: this tab contains the settings of category and tag.
You can set up like the photo below.

Categories:
- You should choose “Yes”, this can be important when you use it as a landing page for your website.
- SEO Tile: You should keep as default Term Title – Separator – Site tile.
- Meta description: You can leave this section blank or add the %Excerpt% prefix.
- Yoast SEO Meta Box: Select Show
For the Tags section, I choose “No” because I do not want the double contents on the search engine.
For the Format and Categorie URLs, I want to choose “disabled” and “remove”. “Remove” on Category URLs to make your URLs look shorter and more beautiful.
Then, remember to click “Save changes”.
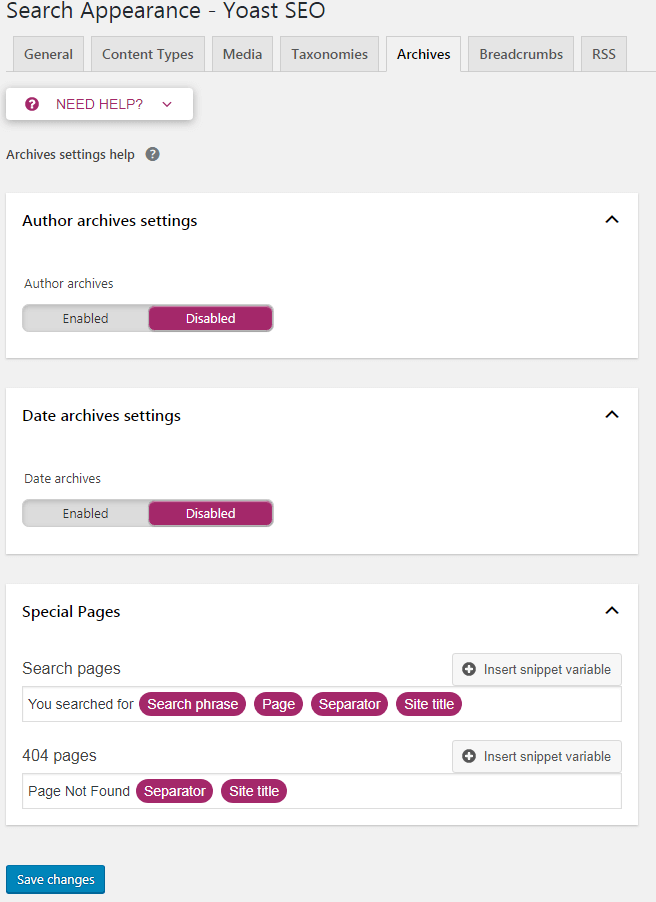
5. Archives Tab: You can set up it as I did in the photo below.
Please note that at the “Author archives settings”, if a website is a blog a specific topic or news, the admin often choose “Enabled” to show the authors of the posts.
If a website is for a company, trademark, or products, I often choose “Disabled”.
6. Breadcrumbs tab: choose Disabled. I do not want to my website have more clusters; I do not set up this tab.

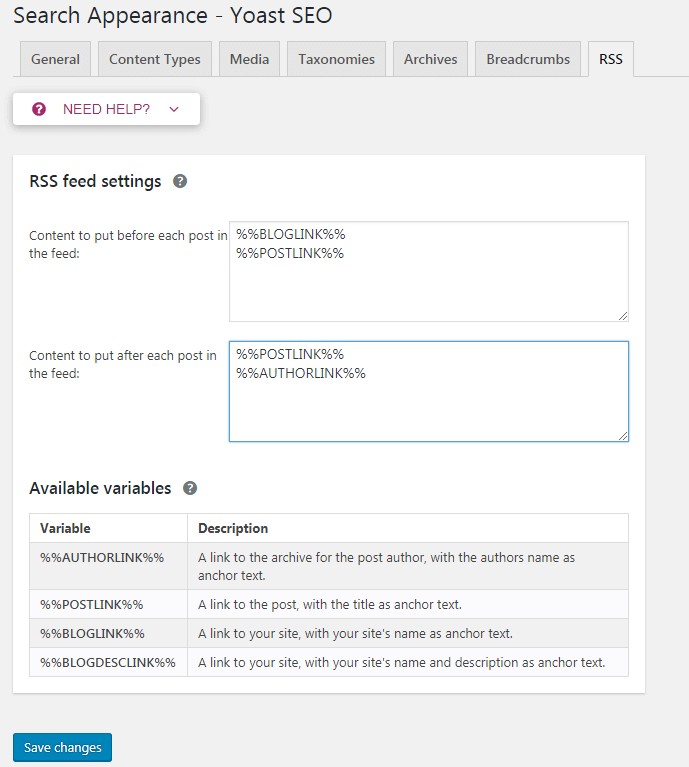
7. RSS feed settings: This tab helps you tell the authority of content on RSS Feed services.
RSS feeds are often used by feed readers to copy contents from your site. Yoast SEO allows you to add a link to link back your posts or pages for each post in RSS.
With this way, you get a backlink from posts of RSS Feed, and Google knows your post is original.
You can configure as below:
Step 3: Set up the Search Console:
· Search Console allows you to connect your WordPress sites with the Google Search Console tool to track and statistics blog issues.
· Before that, you need to add your WordPress site to Google Webmaster Tool and verify and connect with Yoast SEO at this step.
· I do not connect this because I do not want my site to become heavier. Google Search Console tool is really really good on Google. I am sure that you work with it many times to research much information which Google tells you. So, do not connect this.
· Ignore this step.
Step 4: Social
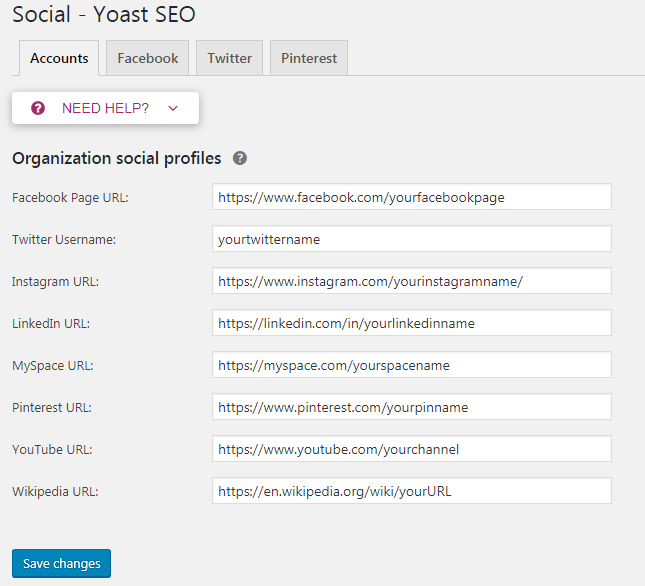
Yoast SEO is a great plugin that has many features to optimize comprehensively.
This section is for all your social accounts. This allows Yoast SEO to tell Google and other search engines about your social networking profiles. You just need to add the URL of each social network account.
You can set up as shown below.
1. Facebook tab: Enabled
On the Facebook tab, at “Open Graph Meta Data”, you make sure it is enabled. This helps Facebook get the right thumbnail and page/post information when a post/page from your website is shared on Facebook.

Facebook App ID: The following notice is to link your site to a Facebook profile. This profile is Facebook App ID application (https://developers.facebook.com/apps).
Default settings: The option is to upload a photo of the “Default Settings” section. This image is used when someone shares your website’s home page on Facebook or a post/page which does not contain a photo. Yoast SEO automatically gets this picture.
2. Twitter tab: Turn on “Enabled”
For the Twitter tab, this allows you to add the Twitter card to the header of your website on this social network when sharing it.
You can also select the type of card to use, so you should use “Summary With large image”.

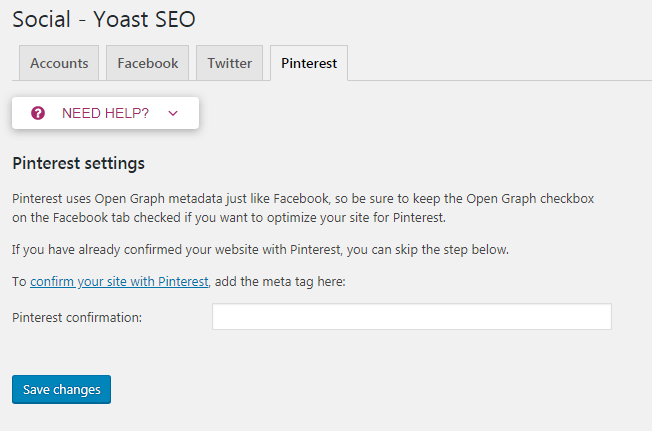
3. Pinterest tab:
Pinterest uses Open Graph metadata like Facebook. Make sure you check the Open graph metadata box item in Pinterest’s settings.
Then you need to enter the website verification code provided by Pinterest. Just visit your Pinterest account settings to add this site verification. You will be provided with a meta tag that you need to enter here. To get code go here: https://www.pinterest.com/settings/claim .
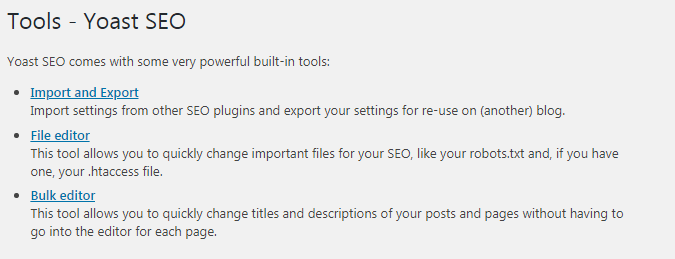
5. Tools
You spend much time to configure the settings for the Yoast SEO plugin, so you may want to export these settings to create a Backup file. Then, if you need to install another website, use this file to upload it to save your time.
· The “Import and Export” function in the Tool section helps you do import or export the setting.
· The “File Editor” section is for helping you edit important SEO files such as robots.txt file, or .htaccess. If you are not good at using these file, you do not touch this.
· The “Bulk editor” section helps you quickly edit the post/page titles and descriptions without having to go into each article. However, I do not recommend to go to this. It is easy to create double contents for titles and descriptions.
Yoast SEO Plugin is considered the top plugin to support the search engine optimization for WordPress websites. When setting up Yoast SEO, you have to notice to do it correctly. If not, your website has terrible ranks on Google as well as other search engines.


Leave a Comment
Log in to post a comment.